
When you’ve got ever used your Google account to sign up to an utility you then may need observed how straightforward it’s. You solely have to click on one button and do not should kind your e-mail or password. Whereas this appears easy, what occurs below the hood is kind of advanced. Nevertheless, instruments like Passport make it simpler.
On this tutorial, you’ll learn to implement Google authentication in Node utilizing Passport and Categorical.
What Is Passport?
Passport (or Passport.js) is a Node authentication middleware that gives greater than 500 methods for authenticating customers together with social authentication utilizing platforms like Google and Twitter.
You’ll use passport-google-oauth2 technique to authenticate customers on Google.
Making a Google Authentication System in Node
That is an summary of the authentication system you’ll create:
- When a consumer clicks on the login button, they are going to be despatched to the Google sign-in web page the place they may sign up.
- Google will redirect the consumer to your utility with an entry token. The entry token offers you permission to entry the profile data of that consumer.
- Ship the entry token to Google to get the profile information.
- Create a brand new consumer or retrieve the present consumer from the database.
- Use JWTs to guard delicate routes.
Tips on how to Set Up Google Authentication in NodeJS Utilizing Passport
Comply with the steps under to authorize customers with Google OAuth,
Step 1: Create a Google Consumer ID and Consumer Secret
Earlier than utilizing Google to sign up customers to your app, you must register your utility with Google to get the consumer ID and consumer secret to make use of when configuring Passport.
Log in to the Google Cloud console and comply with the next steps to register your app.
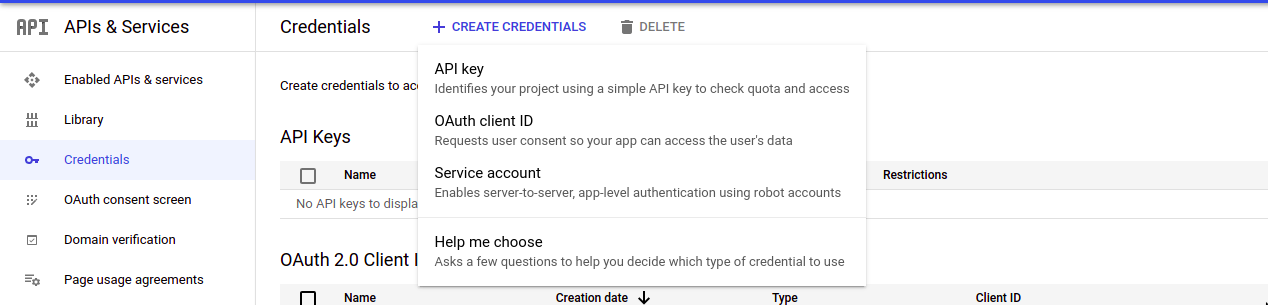
Create a brand new challenge. Within the menu bar, choose Credentials and on the drop-down listing, choose OAuth consumer ID.
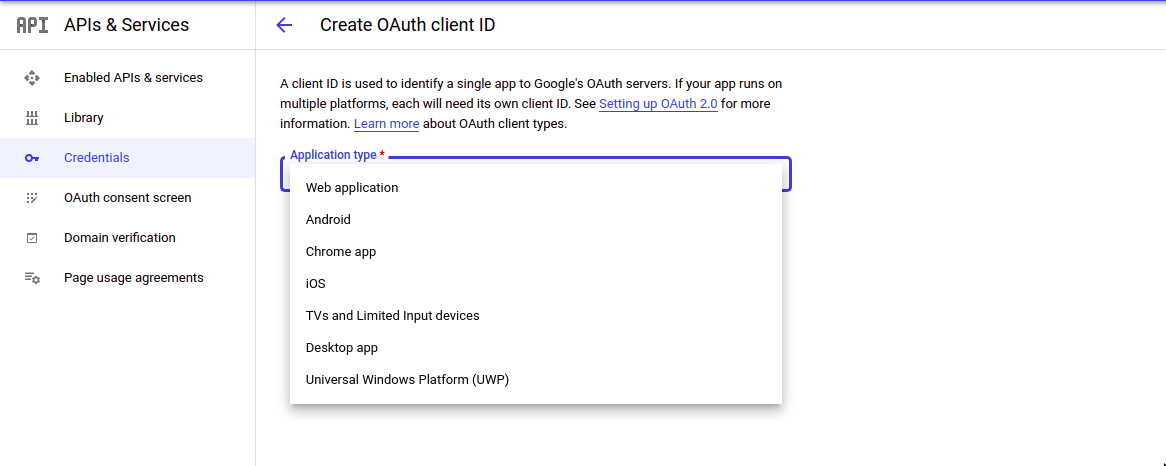
For the appliance kind, choose Net utility. Add the popular title on your utility within the Title discipline.
Below approved redirect URIs, use http://localhost:3000 and http://localhost:3000/auth/google/callback for approved redirect URIs.
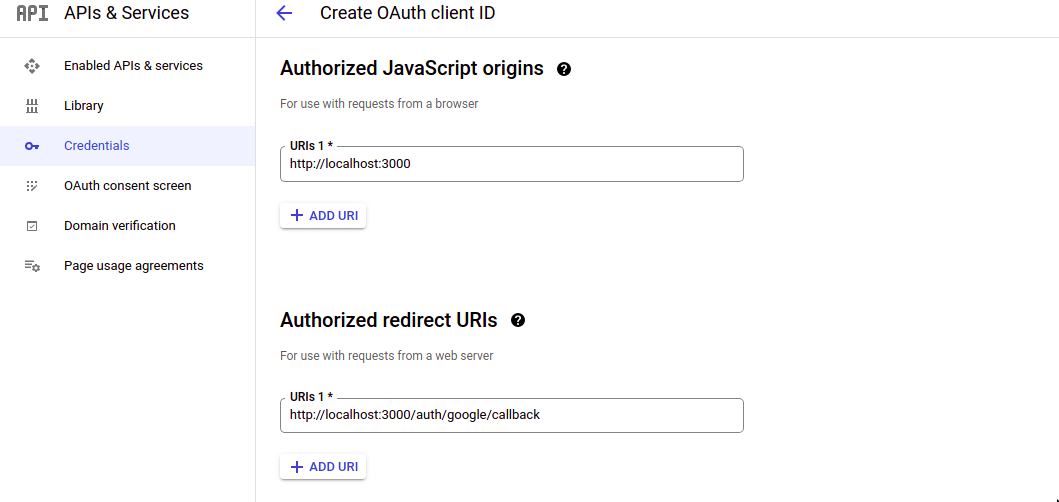
Click on create to create the OAuth consumer. For the reason that app credentials are delicate, you may have to create a .env file and add the consumer ID and consumer secret to it.
CLIENT_ID = <client-id>CLIENT_SECRET = <client-secret>
Step 2: Set Up Node Server
Create a folder, user-google-auth, and navigate to it.
mkdir user-google-auth
cd user-google-auth
Initialize npm to create bundle.json.
npm init -ySince you’ll be utilizing specific to create the server, set up it by working the next command.
npm set up specificOpen the folder along with your most well-liked textual content editor and create a brand new file app.js. It’s going to function the entry level of your utility.
Create the NodeJS server in app.js.
const specific = require("specific");
const app = specific();
const PORT = 3000;
app.hear(PORT, () => {
console.log(`Listening on port ${PORT}`);
});
Step 2: Set Up MongoDB
You’ll retailer the consumer information acquired from Google in a MongoDB database. Earlier than saving the consumer data, you must outline the construction through which the information can be saved. Mongoose is ideal for this. It offers a reasonably simple manner of making information fashions.
Set up mongoose.
npm set up mongooseCreate a brand new file userModel.js, and create the consumer schema.
const mongoose = require("mongoose");
const { Schema } = mongoose.mannequin;
const UserSchema = new Schema({
google: {
id: {
kind: String,
},
title: {
kind: String,
},
e-mail: {
kind: String,
},
},
});
const Consumer = mongoose.mannequin("Consumer", UserSchema);
module.exports = Consumer;
In userModel.js, you’ve got imported mongoose and created a brand new schema.
Discover that you’re grouping the data from Google. That is particularly helpful if you find yourself additionally utilizing different authentication strategies and a consumer makes use of a couple of. It makes stopping double registration simpler.
Subsequent, create db.js.
const mongoose = require("mongoose");
mongoose.Promise = international.Promise;
const dbUrl = "mongodb://localhost/consumer";
const join = async () => {
mongoose.join(dbUrl, { useNewUrlParser: true, useUnifiedTopology: true });
const db = mongoose.connection;
db.on("error", () => {
console.log("couldn't join");
});
db.as soon as("open", () => {
console.log("> Efficiently related to database");
});
};
module.exports = { join };
Hook up with the database in app.js.
const specific = require("specific");
const app = specific();
const PORT = 3000;
const db = require("./db");
db.join();
app.hear(PORT, () => {
console.log(`Listening on port ${PORT}`);
});
Step 3: Set Up Passport
Set up passport and passport-google-oauth2.
npm i passport passport-google-oauth2Create a brand new file, passportConfig.js, and import the Google technique from passport-google-oauth2 and userModel.js.
const GoogleStrategy = require("passport-google-oauth2").Technique;
const Consumer = require("./userModel");
Use your app credentials to configure passport with Google OAuth.
module.exports = (passport) => {
passport.use(new GoogleStrategy({
clientID: course of.env.CLIENT_ID,
clientSecret: course of.env.CLIENT_SECRET,
callbackURL: "http://localhost:3000/auth/google/callback",
passReqToCallback : true
},
async (request, accessToken, refreshToken, profile, accomplished) => {
attempt {
let existingUser = await Consumer.findOne({ 'google.id': profile.id });
// if consumer exists return the consumer
if (existingUser) {
return accomplished(null, existingUser);
}
// if consumer doesn't exist create a brand new consumer
console.log('Creating new consumer...');
const newUser = new Consumer({
technique: 'google',
google: {
id: profile.id,
title: profile.displayName,
e-mail: profile.emails[0].worth
}
});
await newUser.save();
return accomplished(null, newUser);
} catch (error) {
return accomplished(error, false)
}
}
));
}
When you obtain the profile data from Google, verify whether or not the consumer exists within the database. In the event that they do, merely return the discovered consumer. If the consumer is new, create a brand new doc within the database and return the created consumer.
Observe that you’re working with env variables so use the npm bundle dotenv to entry them in your utility.
Set up dotenv.
npm set up dotenvUse dotenv in app.js.
require("dotenv").config()In app.js, cross passport to passportConfig.js
const passport = require("passport");
require("./passportConfig")(passport);
Step 4: Create Authentication Routes
You want three routes to:
- Redirect the consumer to the Google sign-in web page to get the entry token.
- Retrieve consumer information utilizing the entry token acquired.
- Redirect the consumer to the profile web page after profitable authentication.
// Redirect the consumer to the Google signin web page
app.get(
"/auth/google",
passport.authenticate("google", { scope: ["email", "profile"] })
);
// Retrieve consumer information utilizing the entry token acquired
app.get(
"/auth/google/callback",
passport.authenticate("google", { session: false }),
(req, res) => {
res.redirect("/profile/");
}
);
// profile route after profitable sign up
app.get("/profile", (req, res) => {
console.log(req);
res.ship("Welcome");
});
Step 5: Defend Personal Routes
Now that you’ve logged in as a consumer, how are you going to prohibit some components of your utility to authenticated customers solely? One technique to go about it’s utilizing JSON Net Tokens(JWTs). JWTs provide a safe manner of transmitting the data. To authorize customers utilizing JWTs, your utility will:
- Generate a token utilizing the consumer information.
- Go the token to the consumer (the consumer will ship again the token with requests that want authorization).
- Confirm the token despatched again.
- Grant entry to the consumer if the token introduced is legitimate.
Set up jsonwebtoken to work with JWTs.
npm set up jsonwebtokenIn app.js, import jsonwebtoken.
const jwt = require("jsonwebtoken")Modify the Google callback URL to signal the consumer and generate a token.
app.get(
"/auth/google/callback",
passport.authenticate("google", { session: false }),
(req, res) => {
jwt.signal(
{ consumer: req.consumer },
"secretKey",
{ expiresIn: "1h" },
(err, token) => {
if (err) {
return res.json({
token: null,
});
}
res.json({
token,
});
}
);
}
);
In case you log in, you’ll obtain the token.
Subsequent, use passport-jwt, a JWT technique offered by Passport to confirm the token and authorize customers.
npm set up passport-jwtIn passportConfig.js, add the JWT technique.
const JwtStrategy = require("passport-jwt").Technique;
const { ExtractJwt } = require("passport-jwt");
module.exports = (passport) => {
passport.use(new GoogleStrategy(
// Google technique
);
passport.use(
new JwtStrategy(
{
jwtFromRequest: ExtractJwt.fromHeader("authorization"),
secretOrKey: "secretKey",
},
async (jwtPayload, accomplished) => {
attempt {
// Extract consumer
const consumer = jwtPayload.consumer;
accomplished(null, consumer);
} catch (error) {
accomplished(error, false);
}
}
)
);
}
Right here, you might be extracting the token from the authorization header the place it’s saved—which is way safer than storing it within the request physique.
As soon as the token is verified, the consumer object is distributed again to the request physique. To authorize customers, add the passport JWT authentication middleware to protected routes.
app.get(
"/profile",
passport.authenticate("jwt", { session: false }),
(req, res, subsequent) => {
res.ship("Welcome");
}
);
Now, solely requests that present a legitimate token will get entry.
Subsequent Steps
This tutorial confirmed you the way you should use Passport to sign up customers to your utility utilizing their Google account. Utilizing Passport is way less complicated than different kinds, and you may save numerous time via utilizing it.
Passport additionally offers different authentication methods to make use of with different id suppliers, like Twitter and Fb. So, it is value checking these out as effectively.
Learn Subsequent
About The Writer
