All web browsers include an autofill characteristic that enables customers to save lots of their login info for particular web sites. The browser then holds the login credentials in its reminiscence and mechanically fills them the following time you entry that web site.
Chances are you’ll want to disable this characteristic or cease autofilling on particular web sites to fulfill your considerations. Fortuitously, most browsers can help you handle the password autofilling characteristic. We’ll present you learn how to do it on Chrome, Firefox, Microsoft Edge, and Opera.
Why Is Disabling Autofill Useful?
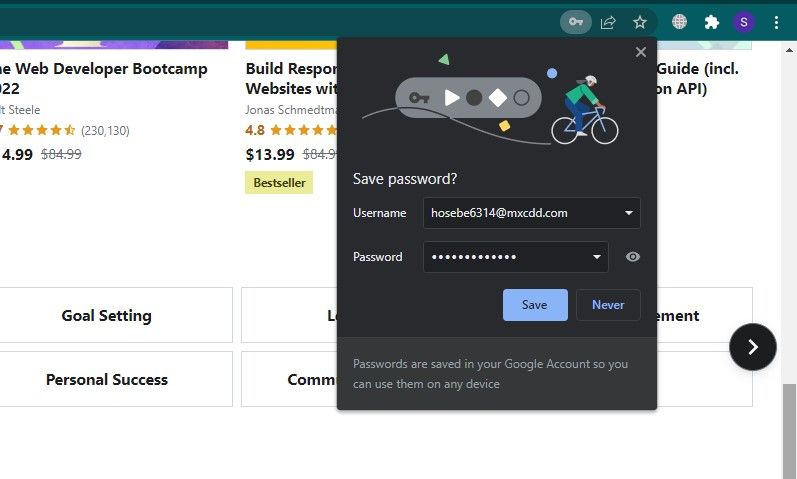
By disabling password autofilling, you’ll be able to cease browsers asking to save lots of the added info in a pop-up whereas logging onto web sites. This prevents your login info from being unintentionally saved whereas engaged on a shared laptop.
In consequence, it relieves you of the trouble of deleting the data out of your browser which may have been unintentionally saved.
As well as, you will not put your knowledge in danger once you unintentionally click on on the pop-up to save lots of these credentials and neglect to take away them from the browser on a shared laptop.
Methods to Handle Autofill Settings in Microsoft Edge
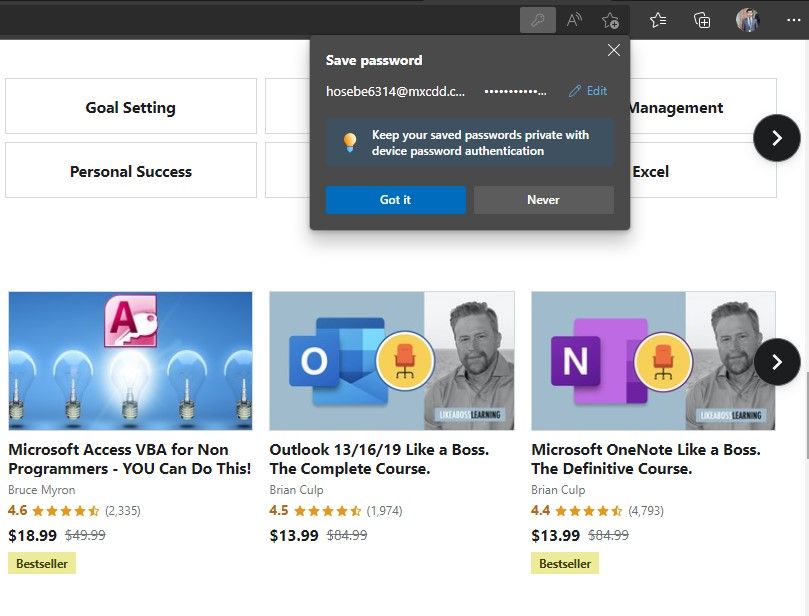
Microsoft Edge lets you disable password saving for all web sites, customise autofilling throughout sign-in, change your saved passwords, and even cease Microsoft Edge from saving passwords for particular web sites.
Let’s discover the place you are able to do all this customization in Microsoft Edge.
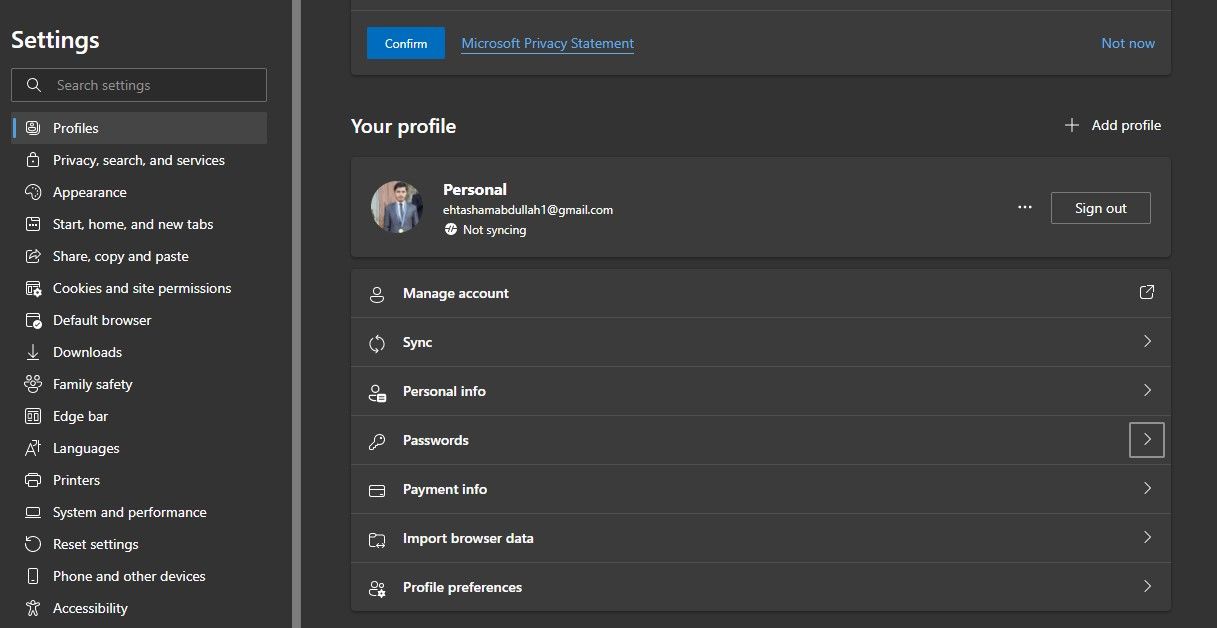
Click on on the three horizontal dots within the top-right nook and navigate to Settings. Go to the Profiles part on the left-sidebar and click on Passwords within the right-hand pane.
Methods to Disable Autofill in Microsoft Edge
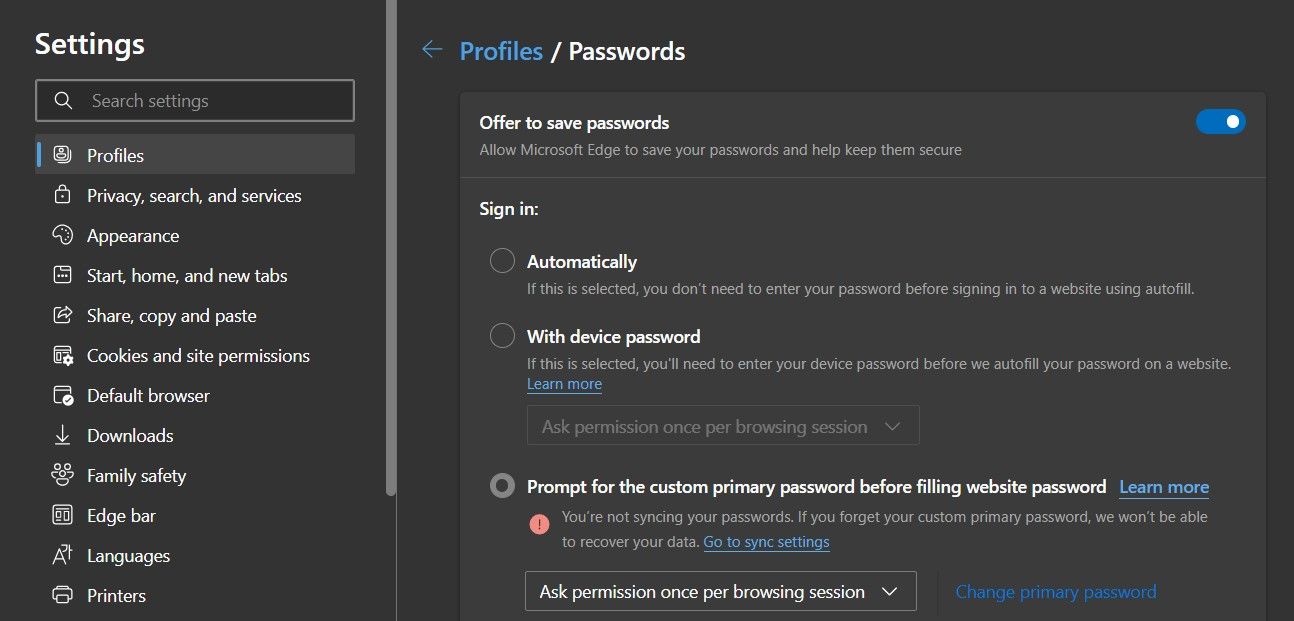
You possibly can flip off the toggle for “Provide to save lots of passwords” to keep away from Microsoft Edge even making an attempt to save lots of login info in a pop-up.
Methods to Handle Autofill Throughout Signal-in With Edge
Underneath the autofilling toggle, you’ll be able to customise how the password autofills throughout sign-in. You could have three choices.
- Mechanically: Once you set the Signal-in settings to this feature, your browser will mechanically fill within the saved info once you go to the web site.
- With machine password: In the event you select this setting, the browser will ask to your machine’s password earlier than it would autofill login info on the web site. It’s useful to have this feature to forestall prying eyes from logging into your account by noticing that your laptop computer is idle whereas logged in.
- Customized major password: This setting lets you set a major password that differs out of your machine’s password. To autofill the saved info, it’s good to enter this major password first. This ensures elevated safety for autofilled info.
Managing Present Autofilled Passwords in Microsoft Edge
Proper beneath the Signal-in customizations, you will discover a checklist of already saved passwords. To edit or change the saved password, click on on the three horizontal dots subsequent to the password and choose your most well-liked change.
Subsequent, authenticate your self with the password to your machine or major password, and add the brand new info. After that, click on the Submit button. Or, click on Delete to take away the saved info.
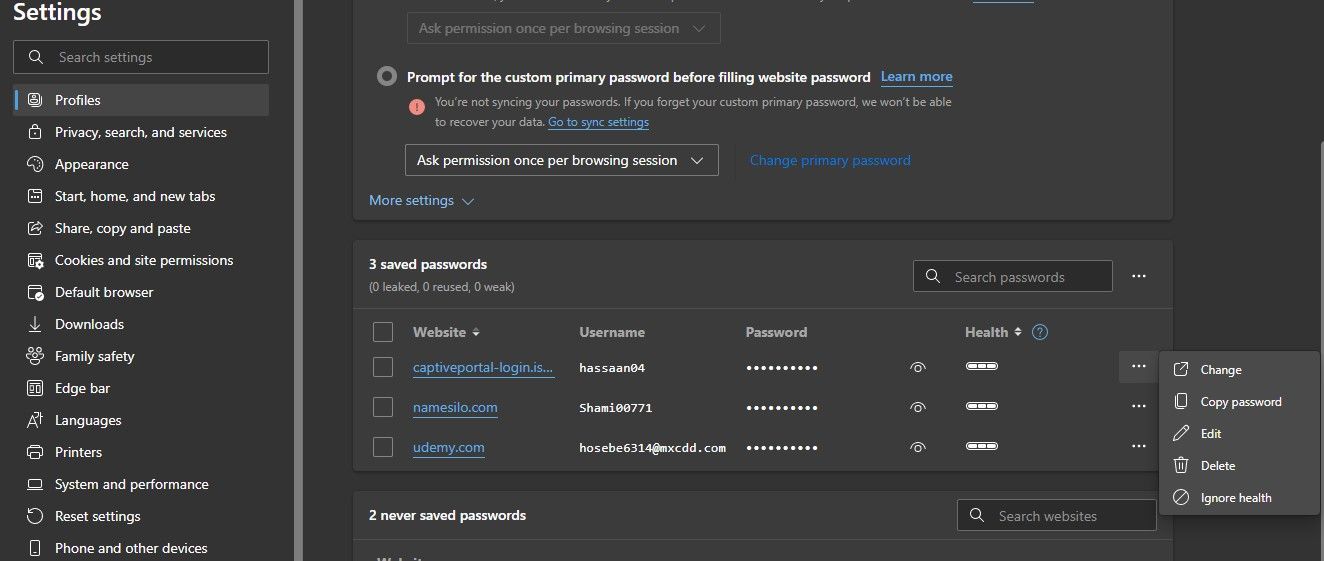
Equally, by clicking on the three dots subsequent to the “Search passwords” search field, you’ll be able to import the passwords into the browser or export them from Microsoft Edge.
Methods to Cease Autofill Requests on Sure Web sites in Edge
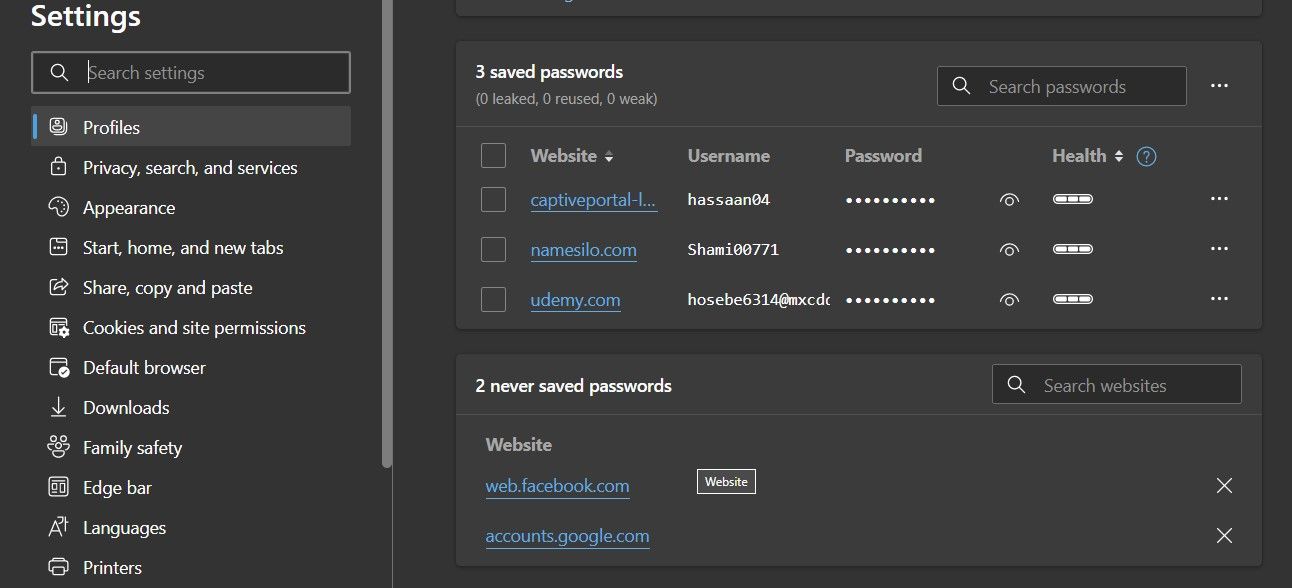
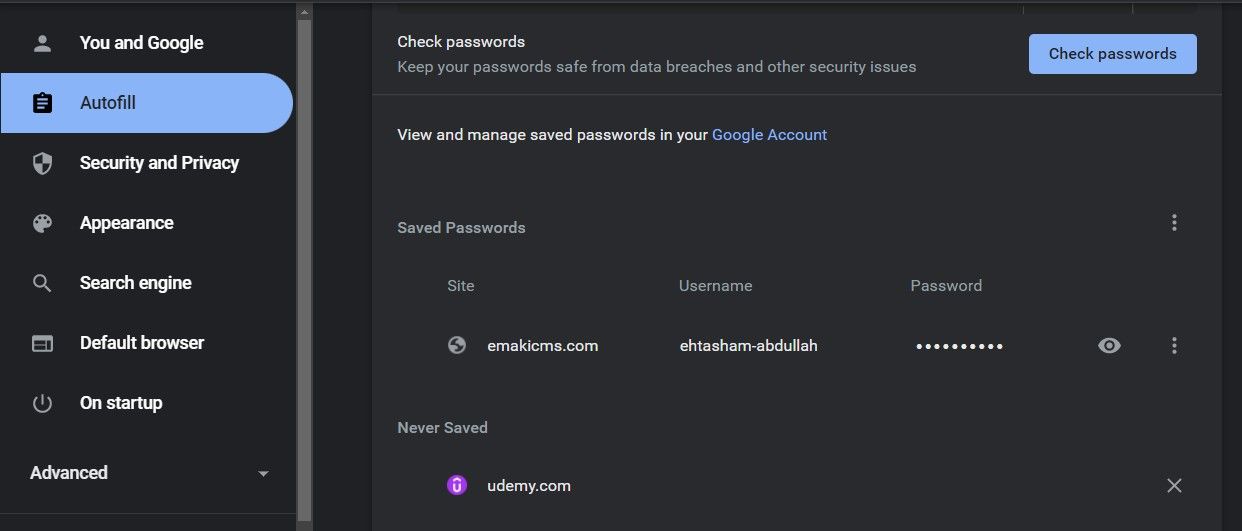
Within the by no means saved passwords part, you will discover a checklist of all of the web sites you’ve got instructed Edge to not save the login info for. To take away a specific web site, click on on the cross(X) icon.
You probably have by no means stopped autofilling on particular web sites and the checklist is empty, you’ll be able to cease autofilling requests in your chosen web sites by choosing “By no means” within the autofill request pop-up.
Methods to Handle Autofill Settings in Chrome
With Chrome, you’ll be able to disable password saving requests, management the sign-in course of utilizing saved info, and examine and handle already saved passwords.
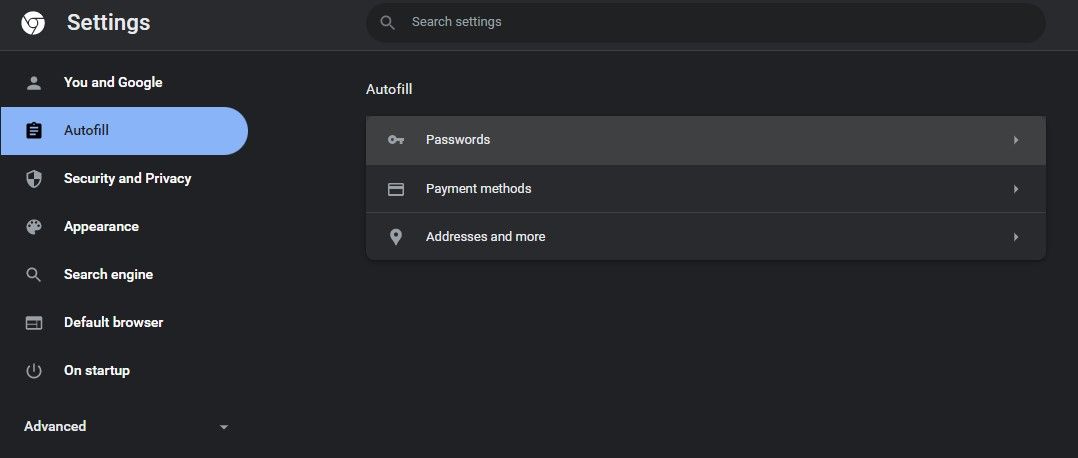
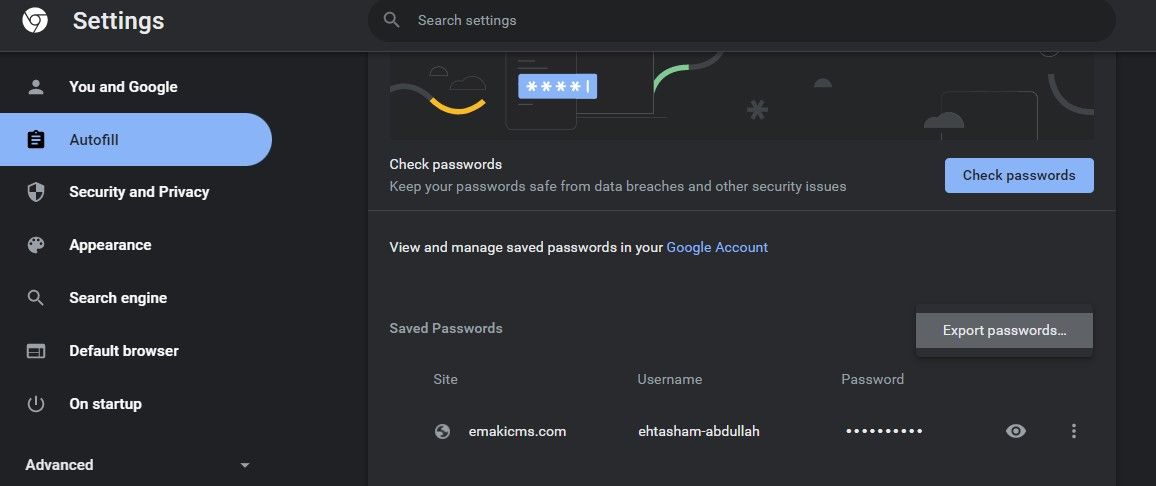
To vary the setting for autofilling passwords, click on the three vertical dots within the top-right nook and go to Settings. Go to the left-sidebar and choose Autofill. Then select Passwords within the right-hand pane.
Methods to Disable Autofill in Google Chrome
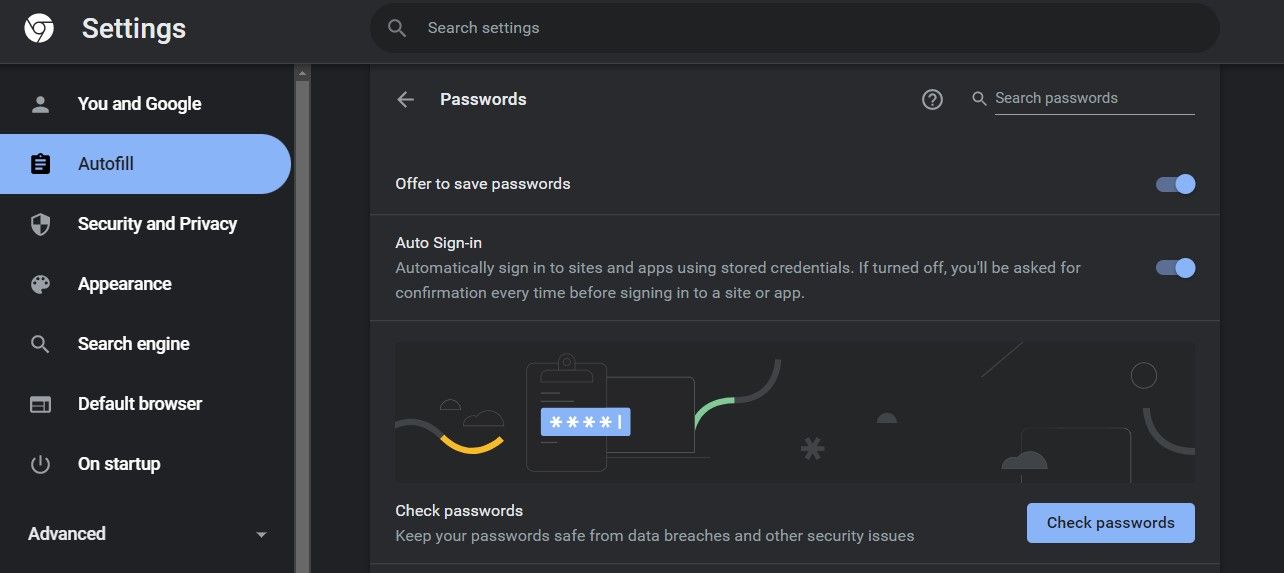
Chrome permits you to flip off autofill requests to save lots of credentials by transferring the toggle for “Provide to save lots of passwords” to the left.
Methods to Handle Autofill Throughout Signal-in With Chrome
Utilizing the Auto Signal-in toggle, you’ll be able to instruct the browser to mechanically sign up to web sites utilizing the saved info. Leaving it off requires your affirmation to autofill.
Managing Present Auto-Stuffed Passwords in Google Chrome
As with Microsoft Edge, you’ll be able to edit or take away saved passwords by clicking on the three vertical dots subsequent to every password.
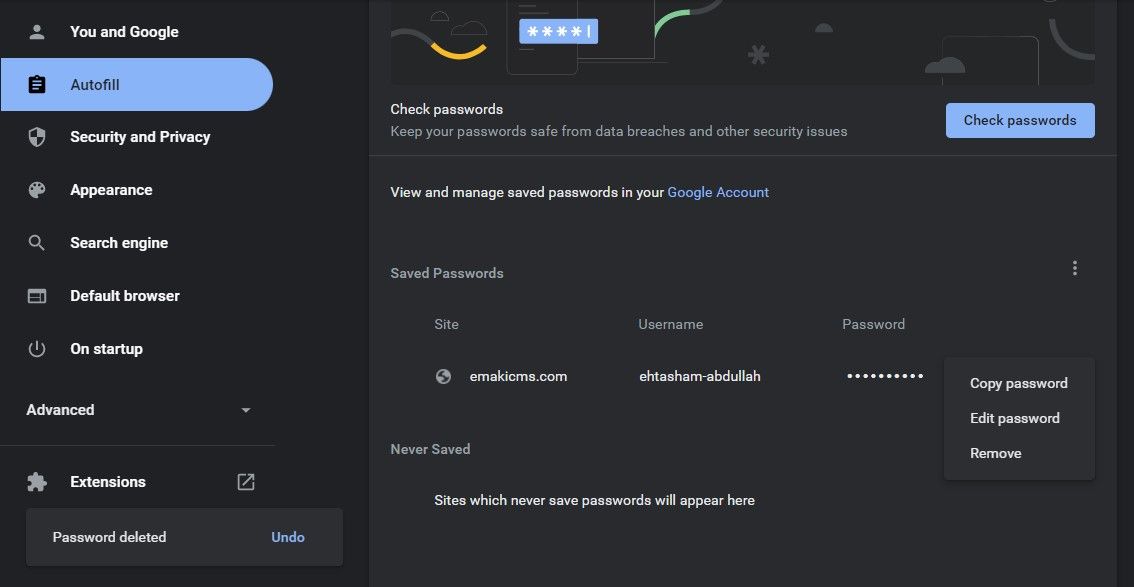
And, versus Microsoft Edge, you’ll be able to solely export (cannot import) the saved password instantly by default. To do this, click on on the three vertical dots subsequent to Saved Passwords and choose Export passwords…
Learn how to import passwords from different sources in Chrome in our article on learn how to import passwords in Chrome.
Stopping Auto-Filling Requests on Sure Web sites
By clicking on the “By no means” button within the autofill pop-up for any web site, you’ll be able to instruct Chrome to cease sending you requests to save lots of passwords to that web site.
In the event you want to take away current blocked web sites, scroll all the way down to the underside of the Autofill web page in settings and click on on the cross (X) subsequent to the web site.
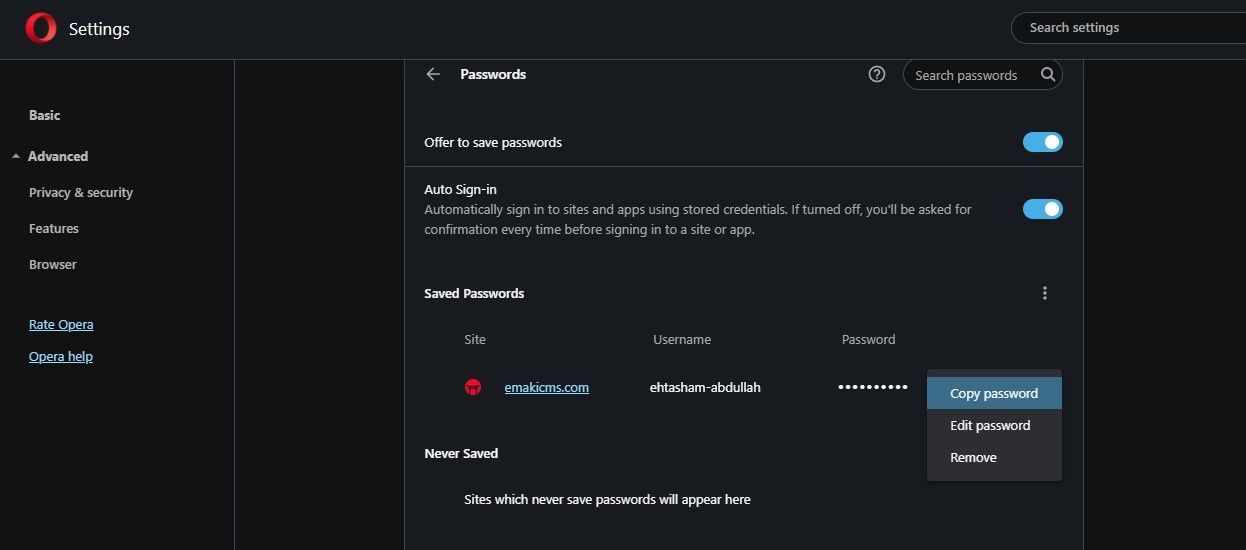
Methods to Handle Autofill in Opera
Opera affords almost the identical customization choices as Chrome. To make these customizations, click on on the three horizontal traces within the top-right nook and navigate to Go to full browser settings.
Scroll to the underside of the Fundamental settings web page and click on the Superior dropdown. Go to the Passwords part of Autofill settings.
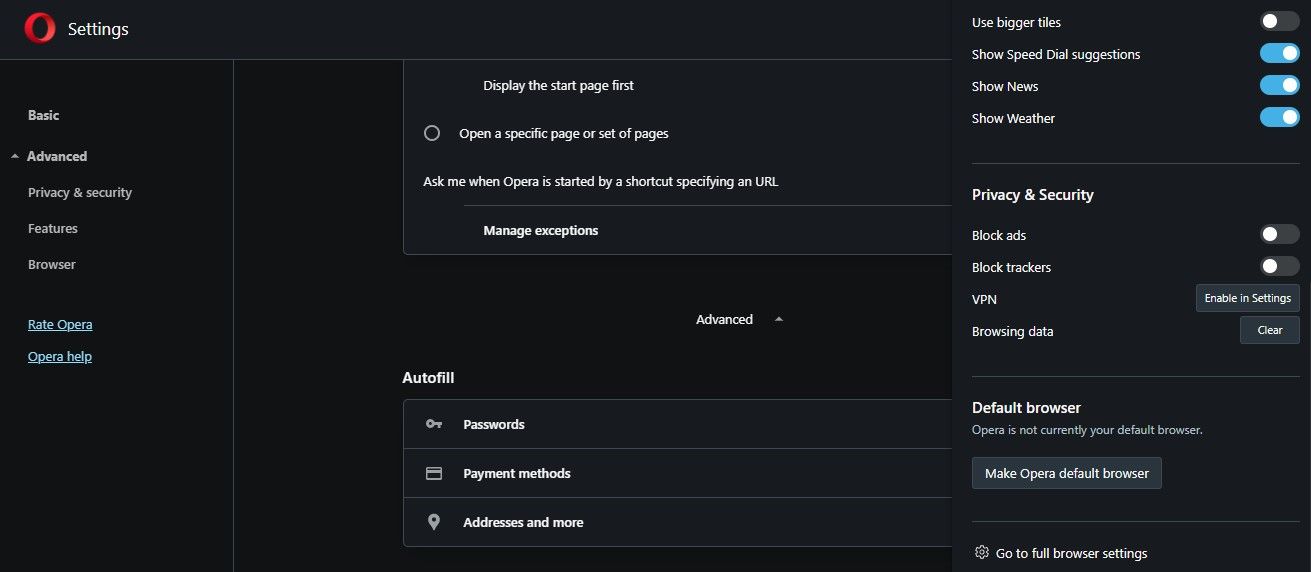
To forestall Opera from saving your login info, flip off the toggle for “Provide to save lots of passwords.”
Equally, you’ll be able to flip off Auto Signal-in, edit or take away the already saved passwords and take away the web sites from the By no means Saved checklist if in case you have already added them to the checklist.
Likewise, you’ll be able to export the passwords from the browser in the identical method as you’ll on Chrome.
Methods to Handle Autofill in Firefox
In Firefox, you’ll be able to block the requests to save lots of passwords on all web sites or make some exceptions to cease these requests from arising on sure web sites. You may as well set a major password to guard your saved info on a shared laptop, like Microsoft Edge.
To make these customizations, click on on the three horizontal traces within the top-right nook and navigate to Settings. Then, go to Privateness and Safety settings on the left-sidebar. Then, scroll all the way down to Logins and Passwords.
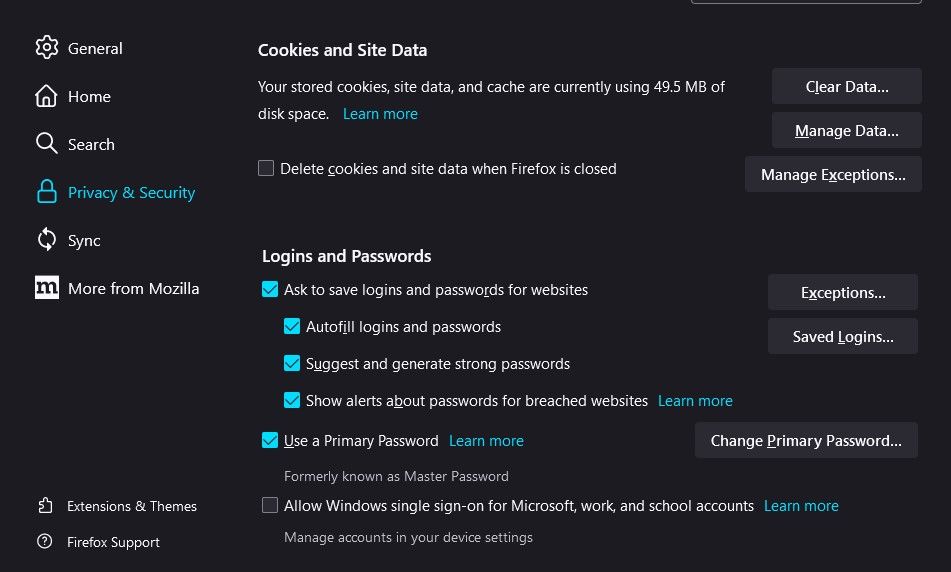
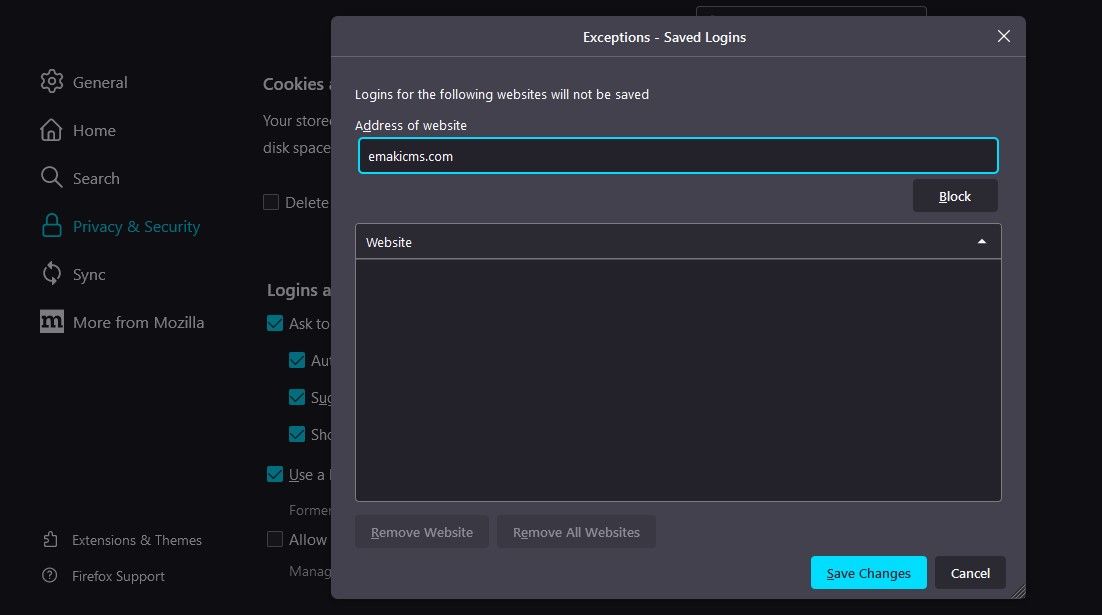
The browser will not request to save lots of passwords once you uncheck the Ask to save lots of logins and passwords for web sites checkbox. If you wish to preserve it on however don’t desire the browser to request saving passwords on sure web sites, add them to the Exceptions checklist.
To do this, click on on the Exception… field, enter the web site’s handle, and hit Save Modifications.
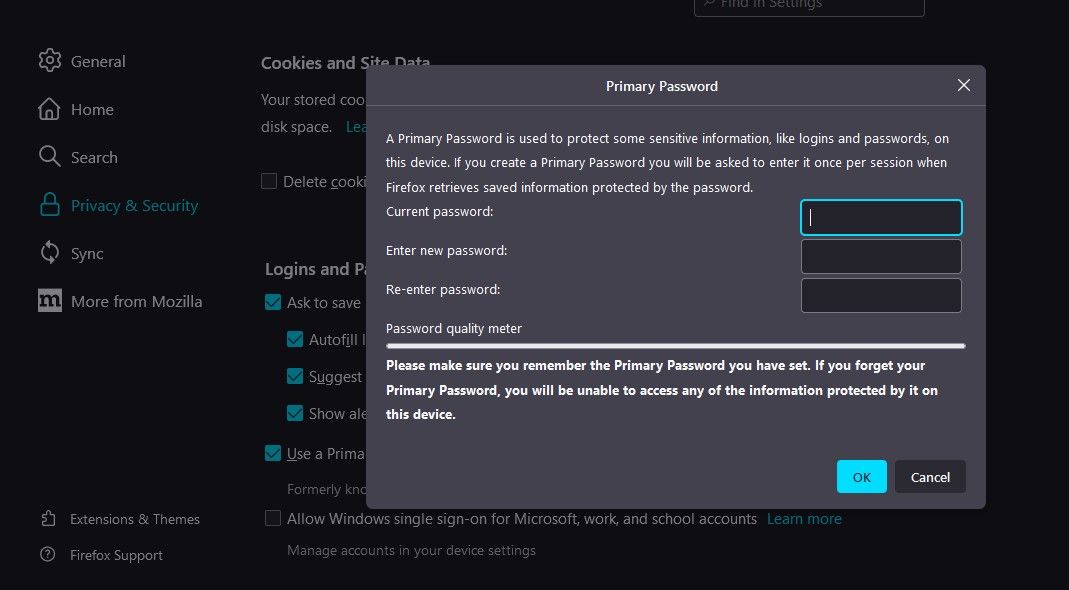
Equally, you’ll be able to examine the field for Use a Major Password, enter a brand new major password, and hit OK. The subsequent time you wish to autofill saved knowledge, you will want this password to authenticate your self.
To take away or edit already saved passwords, click on on the Saved Logins field beneath the Exceptions… field. Then, delete or edit passwords by clicking the corresponding choices.
Do you marvel how your passwords stay safe on-line regardless of large knowledge breaches? Try our article on how do web sites preserve your passwords protected.
Disabled Password Saving in Browsers? Attempt These Options
Hopefully, you’ll customise the password saving and autofilling characteristic to your liking. Once you wish to eliminate saving passwords in your browser solely however nonetheless wrestle to recollect and reenter passwords on totally different web sites, you need to use password administration extensions.
There are a whole lot of password managers on the market, however LastPass and 1Password are two of the higher choices for storing passwords. Each extensions can be found for a lot of browsers and preserve password knowledge constant for customers throughout all browsers.
Learn Subsequent
About The Creator
